Back • Return Home
From Mind To Hand
[Originally written for MelonLand Forum. Come visit!]
Preliminaries
Generally, I find it best to cultivate an attitude of: "I am grateful for where I am and I am excited about where I am going."
Gratitude keeps one from becoming discouraged and excitement keeps one from stagnating. Together, one will always enjoy whatever they do, including the act of doing art. Art should be relaxing, something that we look forward to each day, not something that we would rather avoid because it is so stress-inducing.
It is also important to keep in mind that one might never truly "capture" what is in their head if they have a vivid imagination, even if they are a very skilled artist. However, if one's goal is to create things that are progressively closer to their inner vision as best as they can, then it is only a matter of thoroughly connecting what one sees to what one does. How can this be built into a habit? I will offer a simple method that has been useful to me...
Skill #1: Learning To See Things As They Are [Understanding]
Oftentimes, people replace the shapes and tones of the images that they see with symbols in their own mind. This tendency is particularly evident with optical illusions. Let's go through a few examples that have a strong relevance to drawing...
In The Muller-Lyer Illusion, when multiple lines meet at the same point, they can make the lines that they are attached to seem longer or shorter than they actually are:
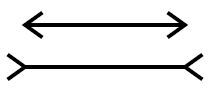
Photo Credit: PsyPhi > SciFi Blog
The two horizontal lines in the above image may seem to be of different lengths, but they are actually the same size!
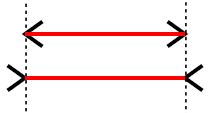
Photo Credit: PsyPhi > SciFi Blog
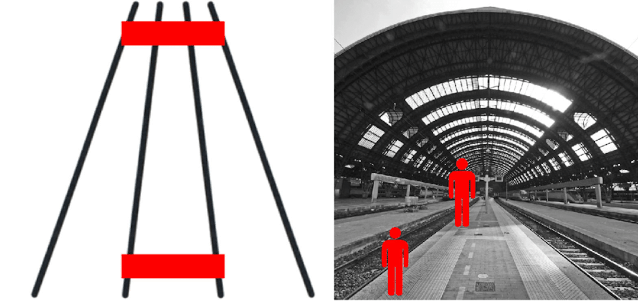
Similarly, within The Ponzo Illusion, overlapping lines might seem to distort the lengths and sizes of others:
Photo Credit: John Picken
Notice how the same is true with more "complex" shapes made up of multiple lines or curves (like the little symbolic "people" in the right-half of the above image).
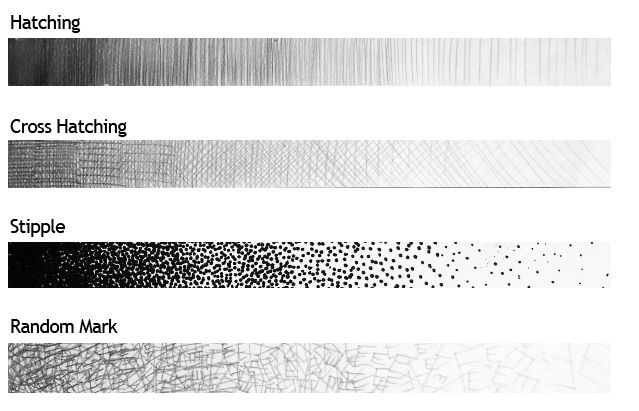
When we group enough lines or dots together (such as in the case of "shading"), we get some sort of tone:
Photo Credit: Benjamin Clancy
Like lines, a tone can seem lighter or darker than it actually is depending upon the tones around it:
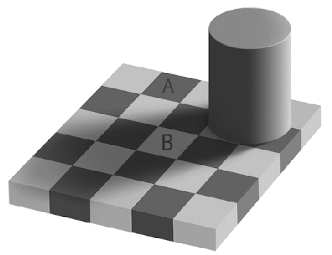
Photo Credit: Beata Stahre Wästberg
While tile B might look like a different shade of gray than tile A, they are both the same!
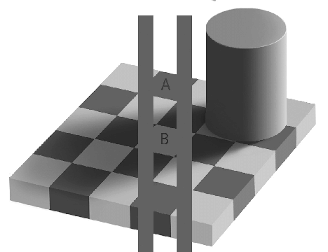
Photo Credit: Beata Stahre Wästberg
This is called The Adelson Checker Shadow Illusion. All of the illusions that we've shown here have one thing in common:
How something is perceived is dependent upon the context in which it arises.
Not only is this a beautiful metaphor for all forms of communication, it is also important in drawing...When we are drawing, we relate the lines that we are about to draw to the ones that we've already set down. Take a reference image and ask yourself, "How long is this line relative to that one? What is the distance or angle between them?" Use a ruler or protractor to check it after you make a guess.
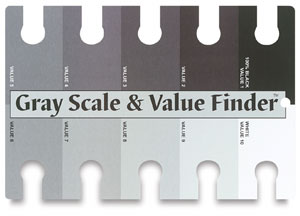
Do the same thing with tones. "Is this tone darker or lighter?" One can purchase little cards that have a "grayscale" printed on them:
Photo Credit: DickBlick
There are little notches cut into each shade of gray to isolate a tone underneath the card to check how light or dark it is in comparison. If you need some pictures to test it out, most photo manipulation programs have settings to turn color photos into black-and-white / monochrome ones.
Skill #2: Learning To Do Things As We Intend [Practice]
Now that we have some awareness of how we see, we can use it to inform our practice of making different types of lines. Fill up some sheets of scrap paper with straight and curved lines of various lengths and pressures.
As you do this, take note of how you hold your drawing instrument and how you move it. If at all possible, grasp it loosely and move from your elbow and shoulder, not your wrist. This gives one a wider range of motion and keeps their hand and back from cramping up. It should be comfortable to draw! Do not make the body tense.
Sometimes it is easier to make straight lines by "pushing" our hand away from our body, with the elbow opening up like a door hinge, whereas curves are sometimes easier to make by "pulling" our hand towards us, swinging our forearm in an arc with the elbow acting like a pivot. Do not be afraid to move the drawing surface around to approach each line from whatever angle is easiest.
Set down two points and try to connect them with a line. If you end up drawing a curve when you intend to make a straight line, do not erase it. Draw another line over it and carefully note how they differ from one another. Notice how we can make the "bow" of a curved line deeper or shallower, until it becomes so shallow that it is completely straight.
Repeatedly draw lines of different kinds over and over again, comparing them to one another, all while paying close attention to your grip and how you move.
Skill #3: Developing Hand-Eye Coordination [Understanding Meets Practice]
Next, try some simple drawing exercises. These can be a lot of fun and will help to connect the two previous skills together.
Start by trying to draw some simple shapes (like triangles, squares, rectangles, circles, and ellipses). When you are about to draw a line, see it as if you have already drawn it on your paper. Keep your eye slightly ahead of the point of your pencil as you move it. Move with awareness and intention.
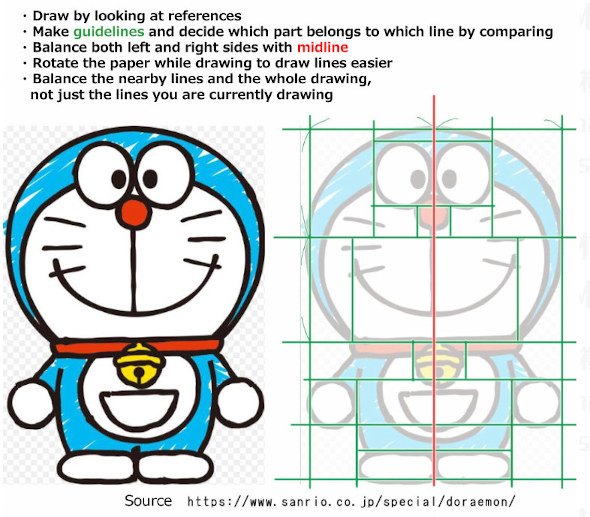
Notice that simple shapes can become the guidelines for more complex ones [as demonstrated here by Manga Materials]:
Photo Credit: Manga Materials
When these simple shapes become easy to draw, learn how to make tones of various shades within their borders. One way of doing this is by steadily moving your forearm back and forth like a windshield wiper, making a series of parallel lines that are somewhat evenly spaced from one another (i.e.: "hatching"). Change the pressure and density of the lines to make those tones lighter or darker. For example, try to mimic the squares of the grayscale:
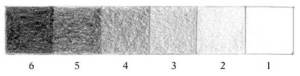
Photo Credit: Benjamin Clancy
They don't have to be "perfect". The tones just have to be noticably different from each other. Repeatedly make various shapes containing tones of different shades, comparing them to one another, all while paying close attention to your grip and how you move.
Skill #4: Making Deliberate Choices [Application]
The previous three skills are foundational. It doesn't matter whether it is "abstract" or "photorealistic", all drawings of any kind whatsoever are based upon them to some extent.
Once we have some facility in them, it then becomes a matter of choosing how we use them and why. What do you want to convey? It is impossible to render the potentially infinite detail within one's imagination or the reality that we see before us, but we can control the simplifications that we make. What will you put in and what will you leave out? We can learn to convey a lot with very few lines and tones, letting the viewer's mind complete the picture.
We have now come "full circle". Use illusions to create symbols by choice, rather than being guided by them without awareness.